Solving a Crackme with Binary Ninja
Binary Ninja
I recently found out that Vector35 has a student discount for their reverse engineering suite Binary Ninja, which I eventually caved in on. It’s very good, especially for the price compared to IDA. To get more familiar with it, I checked out a crackme challenge. Crackmes are a fun way to learn and stay sharp with reverse engineering. I have a habit of looking on crackmes.one and getting sucked into these.
Looking for some Linux challenges I found this one, Hash checker 0x01, by f0rizen. It was uploaded recently so I downloaded it and tossed it into Binary Ninja.
Reversing
Getting started, once you extract the binary and open it into Binary Ninja, it will start analyzing it. We can look at the main function and get a basic idea of what is going on.
One of the most useful features of Ghidra and Binary Ninja is each included decompiler. Binary Ninja’s has several intermediate languages that you can choose from to look at the code, and offers both a linear and graph view for each. Looking at Linear view with the High Level IL (HLIL) output gives a high-level overview of the main function. It is similar to C code, but has some of its own shorthand for specific operations.
![Main function in Binary Ninja, visible calls to a "checker" function with argv[1] as the parameter](/assets/img/crackme_main.png)
There are a few things to note here:
- It checks for there to be only one argument (1 + argv[0], the program path = 2)
- The length of this single argument must be 6
- There is some other validation function named “checker” that must return zero
If any of these are not the case, the program shows the usage message circled below and exits.
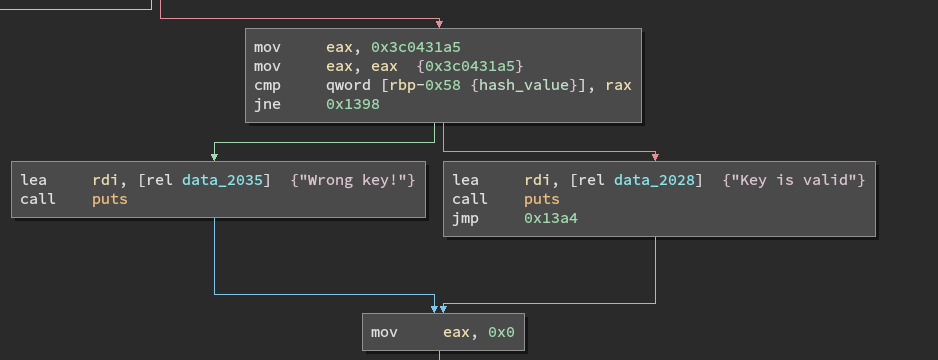
Inside the loops is a a lot of HLIL shorthand. It culminates with a conditional based on a local variable, called var_60_1 by Binary Ninja. This variable is mutated and must equal 0x3c0431a5 for the submitted key to be correct, This is the hash mentioned in the challenge name - We need to pass an input of 6 bytes that is hashed to this value.
We know the input must be six bytes long, but it also must pass the checker function.
int64_t checker(char* key) {
    int32_t counter = 0;
    int64_t return_value;
    while (true)
    {
        if (counter >= strlen(key))
        {
            return_value = 1;
            break;
        }
        if ((key[((int64_t)counter)] > 47 && \
             key[((int64_t)counter)] <= 57))
        {
            counter = (counter + 1);
            continue;
        }
        return_value = 0;
        break;
    }
    return return_value;
}
After renaming some of the variables, and displaying the values used in the conditional as decimal numbers, it’s easier to see what the function is doing.
It loops over the bytes in the string, and checks that each one is between 48 and 58 - on an ASCII table these are 0-9 digits.
So going back to main, our input basically needs to be 6 ascii digits. This is only 1,000,000 possible combinations, so you could brute force this just from the shell if you wanted to, but that’s not really the spirit of the challenge. Instead we can drill down into what these two loops are doing, implement the hash function, and then brute force the hash.
Loop Setup
Looking at the block before the first loop, we can switch back to Disassembly view to see exactly what is going on:
mov     rax, qword [rbp-0x80 {argv}]
add     rax, 0x8
mov     rax, qword [rax]
mov     rdi, rax
call    strlen
mov     dword [rbp-0x5c {input_length}], eax
mov     rax, qword [rbp-0x80 {argv}]
mov     rax, qword [rax+0x8]
mov     qword [rbp-0x50 {user_input}], rax
mov     eax, dword [rbp-0x5c {input_length}]
cdqe
sub     rax, 0x1
mov     qword [rbp-0x48 {input_minus_one}], rax
Here the length of argv[1] is saved, and the length-1 is saved into another variable that ultimately isn’t used.
mov     eax, dword [rbp-0x5c {input_length}]
cdqe
mov     r14, rax
mov     r15d, 0x0
mov     eax, dword [rbp-0x5c {input_length}]
cdqe
mov     r12, rax
mov     r13d, 0x0
I couldn’t figure out what these instructions are doing, since r12-r15 aren’t actually used in this function. It could just be obfuscation by the author.
What looks like some more obfuscation immediately follows, this time accessed and written to.
mov     eax, dword [rbp-0x5c {input_length}]
cdqe
lea     rdx, [rax*8] // 0x30
mov     eax, 0x10
sub     rax, 0x1
add     rax, rdx
mov     esi, 0x10
mov     edx, 0x0
div     rsi
imul    rax, rax, 0x10
sub     rsp, rax
mov     rax, rsp
add     rax, 0x7
shr     rax, 0x3
shl     rax, 0x3


mov     qword [rbp-0x40 {seed_data_ptr}], rax
mov     rax, qword [rbp-0x40 {seed_data_ptr}]
mov     qword [rax], 0x1
mov     dword [rbp-0x60 {counter}], 0x1
Ultimately the stack pointer is subtracted by 0x30, then 7 is added to it. Finally two writes: this stack address is saved into a pointer and a one is placed there (at RAX). A variable later used as a counter (RBP-0x60) is also set to one.
First Loop
In the first loop, we can see why.
![array[n] = array[n-1] times 0x83 modulo 0x3b9aca09](/assets/img/firstloop.png)
First, the counter is loaded, and then subtracted by one to load into EDX - this is used to calculate an offset from the pointer in the previous block. It is a 64 bit integer, so this is used as an offset from the pointer. On the first iteration, counter = 1, so this is the first (0th) element in the array.
Next, that value is multiplied by 0x83, and then the remainder modulo 0x3b9aca09 is taken. Finally this is saved at the index marked by counter. In short, the loop is basically this:
array[n] = array[n-1] * 0x83 % 0x3b9aca09
You can do the math yourself, or just verify this in the debugger:
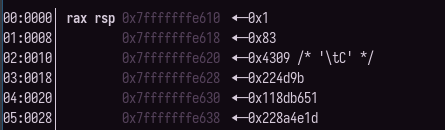
Importantly, these numbers are computed on constants, based on a counter that has to be six - every time you run this program these numbers will be the same. Effectively, it’s just runtime obfuscation of both a pointer (the random bit shifting and saving to rbp-0x40) and the data at that pointer. Despite being generated at runtime it’s effectively static data.
I called this seed data, thinking that this would be relevant in the hash calculation which occurs in the second loop. Knowing that we’re generating this data and seeing a reference to this pointer in the second loop, we can figure out what it is doing.
Hash Function
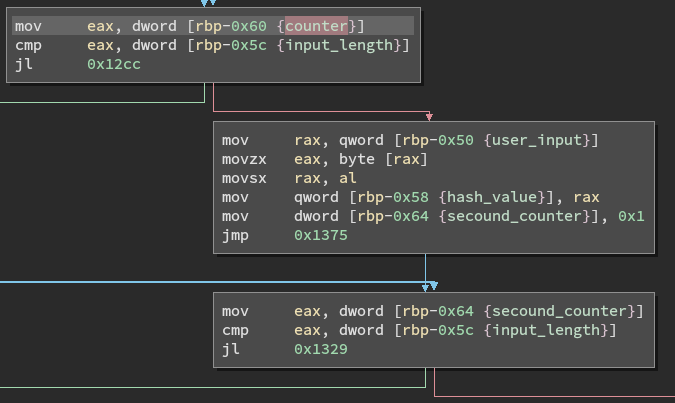
First some initialization is performed - After the first loop is finished, the first counter equals six, then the code follows a new block on the right where the hash is initalized with the first byte of the input. The loop only runs through the last five bytes, so this makes sure all of them factor into the hash.
A second counter is set to 1, since index 0 of the input has already been stored in the hash variable.
The inside of this loop runs five times, and does five main operations.
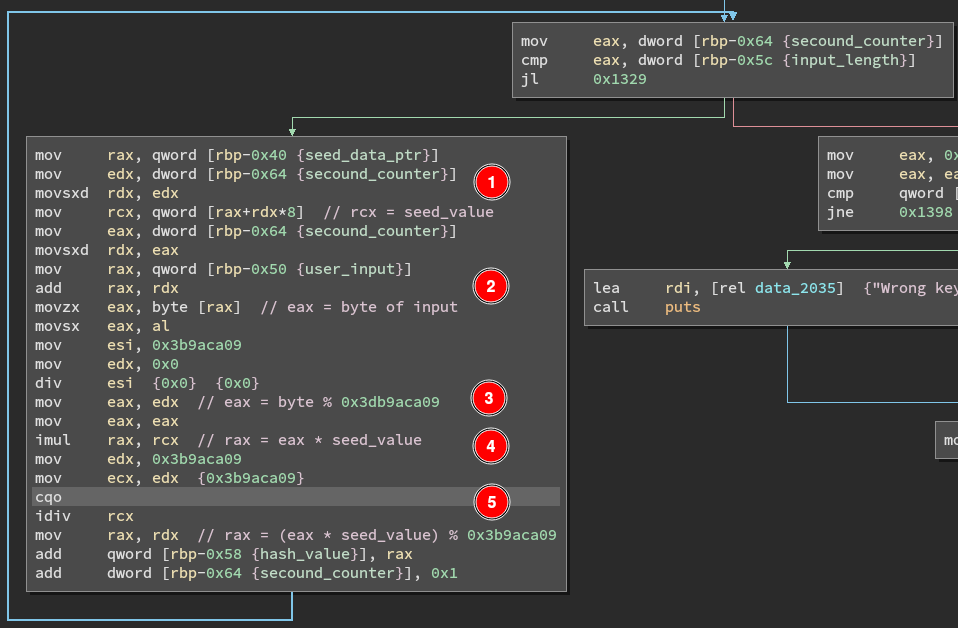
- Get the current value of seed data (0x83 to start) into RCX
- Get the corresponding byte of input into RAX
- Get the remainder of dividing this byte (RAX) by 0x3db9aca09
- Multiply this result by the seed value in RCX
- Divide this by 0x3db9aca09, and add the remainder to the hash
This runs five times, eventually ending the loop with a comparison to the correct hash.
Interestingly, the pre-initialization isn’t really necessary because starting from index zero will produce the same result. The first value % 0x3db9aca09 will equal itself, and multiplying that by the first value of seed data (0x1) has no effect. It’s not immediately clear if this is done by the author or the compiler.
Keygen
Now that we know both the hash and how it is computed, including the seed data/starting state values, we can write brute force any inputs that collide to this value. Since there are only one million possibilities, it can run in under a second.
Starting off we can define some variables for us, including the seed data just as a list.
import itertools

HASH = 0x3c0431a5 # hash value of the input to match
# valid characters, ASCII 0-9
VALID = ['0', '1', '2', '3', '4', '5', '6', '7', '8', '9']

# generated by the first loop in main, always the same
seed = [0x1, 0x83, 0x4309, 0x224d9b, 0x118db651, 0x228a4e1d]
Translating the steps into python, we can write a short loop to implement the hashing.
def keyhash(s: str):
    """return the hash of the input"""
    hashvalue = ord(s[0])

    for i in range(1, len(s)):
        seedval = seed[i]
        b = ord(s[i]) # byte to use
        rem = b % 0x3b9aca09
        m = rem * seedval
        frem = m % 0x3b9aca09
        hashvalue += frem

    return hashvalue
Just like in the challenge binary, it would technically work if the hash was initialized to zero and the loop ran 6 times over the whole input, since the first iteration only multiplies the first value by one.
We can then use itertools’ cartesian product function to brute force all of the keys and check against the hash value.
def main():
    for attempt in itertools.product(VALID, repeat=6):
        test = "".join(attempt)
        check = keyhash(test)
        if check == HASH: # 0x3c0431a5
            print("Solution:", test, hex(check))

    return 0
After running this we can finally see:
$ Solution: 231337 0x3c0431a5
$ ./crackme 231337
Key is valid
$
No collisions, and a valid key.